
Attaining balance in Monster Hunter Wilds can be a formidable task, as every choice, from armor to Talismans, carries inherent trade-offs. However, in the sphere of combat, the Sword and Shield emerges as a versatile tool. Addressing both offensive and defensive strategies, this piece will provide insights on how to effectively utilize your Sword and Shield in Monster Hunter Wilds.
Sword and Shield in Monster Hunter Wilds
The Sword and Shield serves as a reliable tool for both novice hunters and experienced veterans, adept at navigating challenges and engaging in action. Its combination of mobility, damage output, and defensive capabilities renders it an excellent choice for various situations.

Combat Commands and Moves Guide
All Moves
| Command | Move | Description |
|---|---|---|
| Triangle/Y | Standard Attack | A basic sword attack that can be chained into a 4-hit combo. Use the analog stick mid-combo to adjust positioning. |
| Circle/B | Special Attack | Perform a Shield Attack with the analog stick to deal stun damage. Pressing Circle/B alone executes a powerful Lateral Slash. |
| Triangle/Y + Circle/B | Advancing Slash | A forward-moving upward slash. Using this move while sliding downhill or near a ledge triggers a terrain-specific attack. |
| Triangle/Y + Circle/B (During Combo) | Roundslash | A wide-range slash that allows quick directional changes. Chaining it from certain attacks upgrades it into the powerful Spinning Reaper. |
| Hold Triangle/Y + Circle/B (During Combo) | Charged Chop | A leaping attack that deals multiple hits if aimed at an enemy’s weak spot. Power increases when used after specific moves. |
| Forward + Circle/B | Shield Attack | Use your shield to bash enemies, dealing stun damage if you hit their head. |
| Push Back + Circle/B (During Combo) | Backstep | A quick backward dodge during combos to avoid attacks. Press Triangle/Y after a Backstep to unleash Perfect Rush, a multi-hit attack that enhances elemental damage. If timed when the sword flashes, damage is increased. |
| Circle/B During Backstep | Charged Slash | Following a Backstep with a Charged Slash launches you into the air. While airborne, you can follow up with Jumping Slash (Triangle/Y) or Falling Bash (Circle/B). |
| Hold R2/RT | Guard | Use your shield to block incoming attacks. Timing the guard perfectly triggers a Perfect Guard. After a Perfect Guard, press Triangle/Y for a powerful Counter Slash. |
| R2/RT + Triangle/Y | Sliding Swipe | A fast attack that helps close the gap between you and your target. |
| R2/RT + Square/X | Use Item | Allows the use of certain items while the weapon is drawn. |
| L2/LT + R1/RB | Focus Strike: Vital Stab | A precise stab effective against weak spots. After landing a hit, follow up with Falling Slash (Triangle/Y) or Upswing Bash (Circle/B). |
All Combos
For those players who wish to deliver significant damage while staying undetected by adversaries, it is important to pay attention to these crucial combinations.
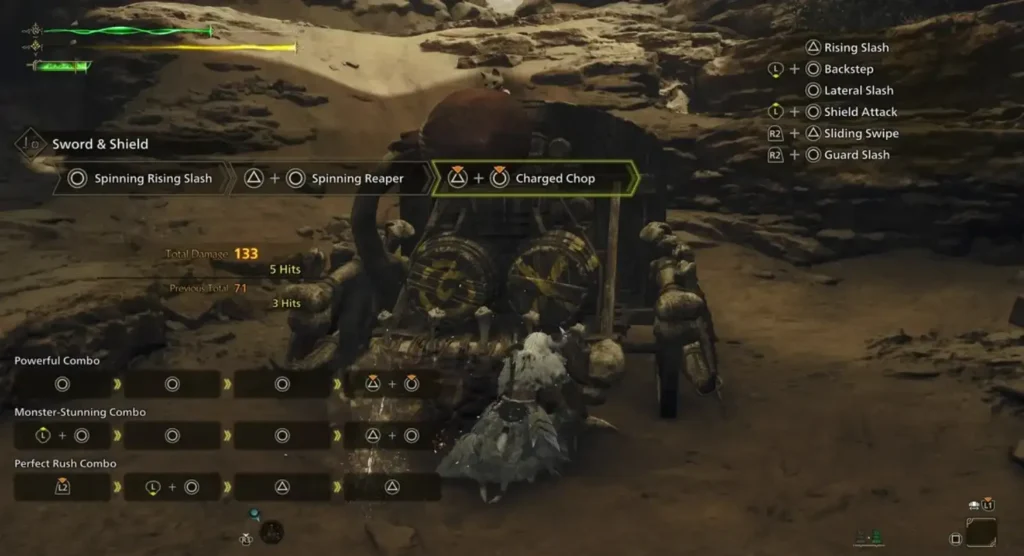
Lateral Slash Combo
The standard Lateral Slash combination can facilitate greater damage output when you integrate the Spinning Reaper and Charged Chop attacks. Commence with Lateral Slash (Circle/B), then move to Return Stroke (Circle/B), followed by Spinning Rising Slash (Circle/B), and conclude with Spinning Reaper (Triangle/Y + Circle/B) and Charged Chop (Hold Triangle/Y + Circle/B).
This swift and powerful combo will effectively target enemies and can be performed without being locked into a lengthy animation.
Shield bash Combo
To effectively incapacitate your target, employ the Shield Attack combination. Begin by directing your analog stick forward and pressing Circle/B to initiate the sequence. Follow this with two additional presses of Circle/B, concluding with a Guard Slash (R2/RT + Circle/B). This technique is particularly advantageous when aiming for a monster’s head, as it can bring down most creatures after only a few repetitions.
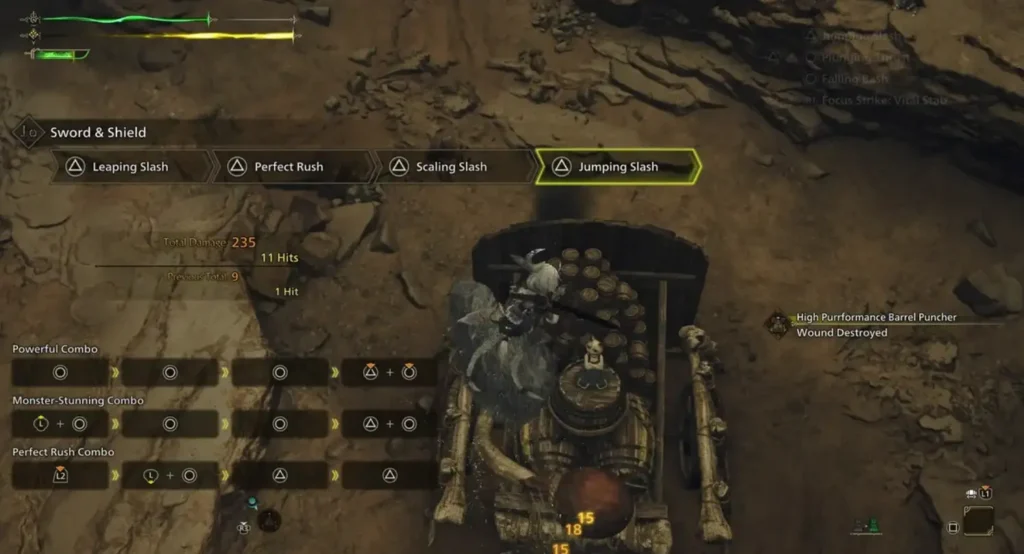
Perfect Rush Combo
Among the various combinations available for the Sword and Shield in the game, the Perfect Rush combo is undoubtedly the most powerful. To execute it, start with any attack, then perform a Backstep (by pushing back the analog stick and pressing Circle/B), followed by a Leaping Slash (Triangle/Y), and proceed into Perfect Rush (Triangle/Y), a Scaling Slash (Triangle/Y), and finish with Falling Bash (Circle/B).
The essence of this strategy lies in timing, as precise timing boosts the damage output of the attacks. For moves like Backstep, Leaping Slash, and Perfect Rush, it is vital to notice when the hunter flashes red before advancing to the next command. This technique will provide greater damage for the same combination than if one were to engage in random button mashing.
Sword and Shield Tips
By employing the blade and shield together while maintaining swift movement, this guide outlines methods to enhance the effectiveness of the Sword and Shield combination.
Vary Your Attacks
To bring down the target monster effectively, consider employing the Sword and Shield in different strategies to quicken your efforts. Rapid sword attacks will build up elemental damage, while a series of shield strikes, when the opportunity permits, can deliver enough stun damage to incapacitate the creature.
Dodging and Guarding
There will be instances when defense takes precedence, which is where the techniques of Guarding and Backstep become essential. Mastering the execution of Perfect Guards with precise timing can effectively mitigate damage, while Power Clashes provide an additional chance to repel the monster. Employing Backstep allows you to evade danger, simultaneously positioning you for a counterattack. Familiarize yourself with the necessary spacing and timing, and the monsters will regret their attempts to strike.
Focus Strikes
When you create more wounds on the monsters, employing the Focus Strike is crucial for optimal advantage. Unlike other weapons, such as the Long Sword, the Sword and Shield provide the opportunity to execute two different follow-up attacks. You may choose to perform a Falling Slash, which delivers several hits to the monster, or an Upswing Bash, which can be further linked to Falling Bash to increase your stun damage.
Item Usage
A notable advantage for Sword and Shield users in Monster Hunter Wilds is their ability to employ items even while their weapon is drawn. This functionality can be particularly useful for quickly regaining health and re-entering combat or for assisting allies at an accelerated rate. It is advisable to take full advantage of this mechanic to sustain pressure on adversaries.
This concludes the essential information regarding the utilization of the Sword and Shield in Monster Hunter Wilds. For additional assistance with the game, please refer to The Escapist.
Monster Hunter Wilds is available now on PlayStation, Xbox, and PC.


