
The Bow is a super flexible ranged weapon in Monster Hunter Wilds, working well for both short and long-range attacks while keeping you mobile. Check out all the new moves, mechanics, controls, top combos, and some advanced tips to see just how awesome it is!
Monster Hunter Wilds: Bow Mechanics
1️⃣ Ranged Weapon That Relies on Stamina
The Bow in Monster Hunter Wilds stands out as the only ranged weapon that requires stamina to launch arrows at monsters in fights. Different attacks will eat up varying amounts of stamina, and the stronger the attack, the more stamina it tends to use.

2️⃣ Can Fire Different Types of Arrows
The Bow is pretty versatile; it can shoot different types of attacks based on your input, including spread shots, piercing arrows, exploding tracers, and Arc Shots.
It can also use the Dragon Piercer, which hits a monster from end to end for ongoing damage, and the Thousand Dragons, a strong close-range attack that delivers a quick burst of damage.
3️⃣ Can Use Spread Shots Up Close
If you find yourself in tight spaces, the Bow can totally take advantage by firing off Spread Shots. These shots release a spray of arrows that can hit hard when you’re close to your target. The Thousand Dragons, along with Quick Shots, Power Shots, and Power Volleys, are all great options for taking on monsters up close.
4️⃣ Charges Its Attacks to Power Up
The Bow comes with a cool charging feature that boosts its attacks. When you charge up your shots, it uses up some stamina, but they hit way harder than regular shots. For instance, both Normal and Power Shots get more arrows and deal more damage as you charge them up, and charging the Arc Shot makes its area of effect bigger and lasts longer.
Manage and Use the Trick Arrow Gauge
The Trick Arrow Gauge serves as an extra resource for your Bow, used for loading Tracers and coatings. You can fill it up by landing attacks or doing a Discerning Dodge. Just remember, using a Tracer or coating will drain some of that gauge.
This changes how the Bow is played by creating a loop where you fill up the Trick Arrow Gauge, then use it to apply coatings or fire off Tracers for extra damage.
Track Monsters With Tracers
When you use the Ready Tracer move, your next shot turns into an arrow that sticks into a monster. After that, any arrows you shoot will track that monster, dealing extra damage when they hit. This is a great way to amp up your damage and target a specific part of the monster since the arrows will aim for where the Tracer landed.
Tracer Inputs:
- For PC: Hold Left Mouse + E
- For XBOX: Hold RT + X
- For PS5: Hold R2 A + Square
Apply Coatings for Various Effects
| Coating | Effect |
|---|---|
| Power | Increases arrow damage |
| Close-Range | Reduces arrow range but increases their damage |
| Pierce | Allows arrow to pierce and hit multiple times |
| Poison | Arrows inflict Poison Buildup |
| Paralysis | Arrows inflict Paralysis Buildup |
| Sleep | Arrows inflict Sleep Buildup |
| Blast | Arrows inflict Blastblight Buildup |
| Exhaust | Arrows inflict Stun Damage and Exhaust Buildup |
Coatings play a key role in bows, boosting damage or adding status effects based on the type you choose. Keep in mind that each bow is limited to certain coatings, so you won’t always have every option at your disposal.
Unlike in earlier games, you don’t have to craft and keep coatings in your pouch anymore. Now, you simply spend one bar from the Trick Arrow Gauge to refill your selected coating, which will then be used on your next few arrows.
Focus Strike Homes in on Wounds
Focus Strike Inputs:
- For PC: Hold Right Mouse + Shift
- For PS5: Hold L2 + R1
- For XBOX: Hold LT + RB
When you use the Bow’s Focus Strike, a unique reticle pops up. This reticle locks onto wounds and Tracers one at a time, shooting guided arrows at them as soon as you let go of the input.
By charging the Focus Strike, you can launch more arrows, and if it strikes a wound, the Hunter will follow up with a Dragon Piercer.
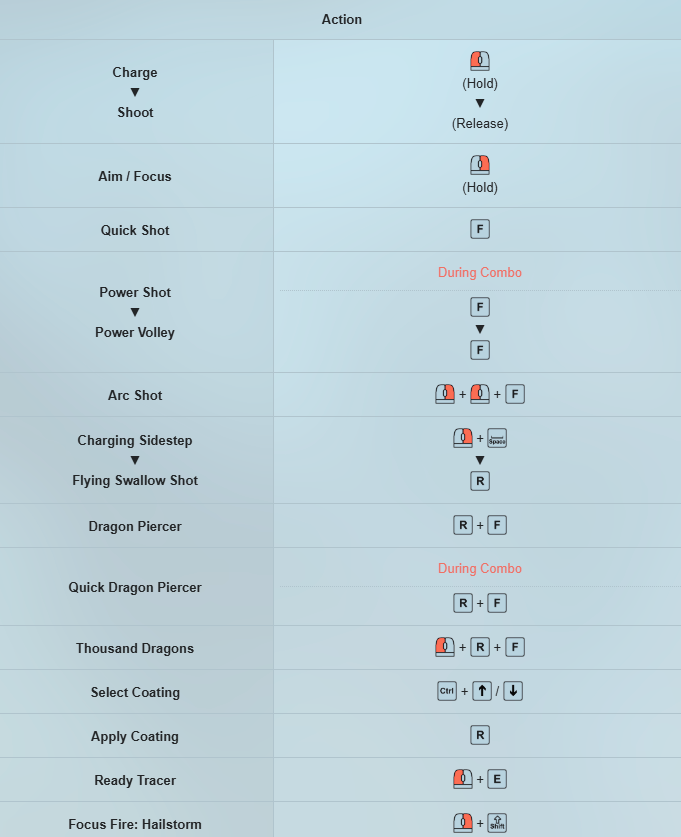
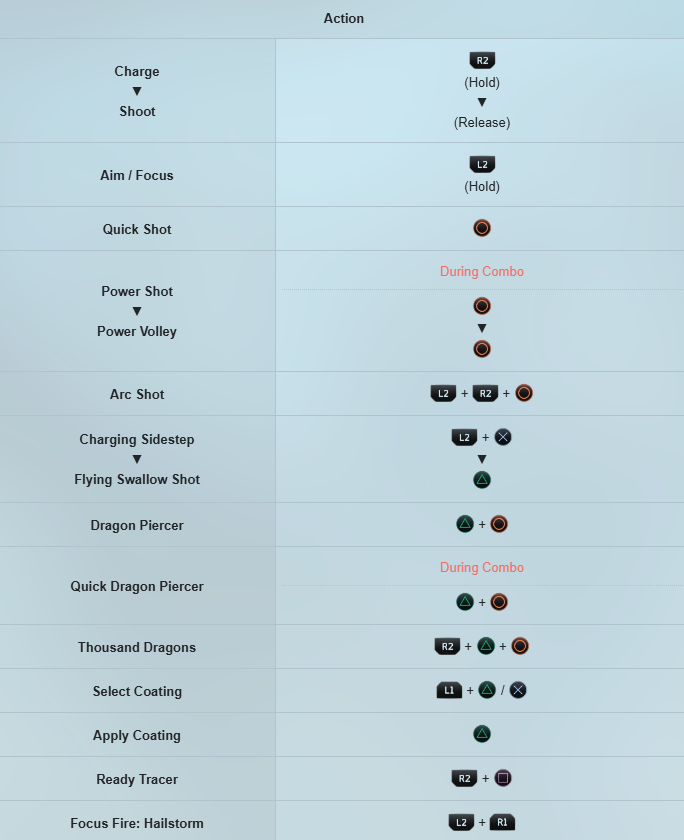
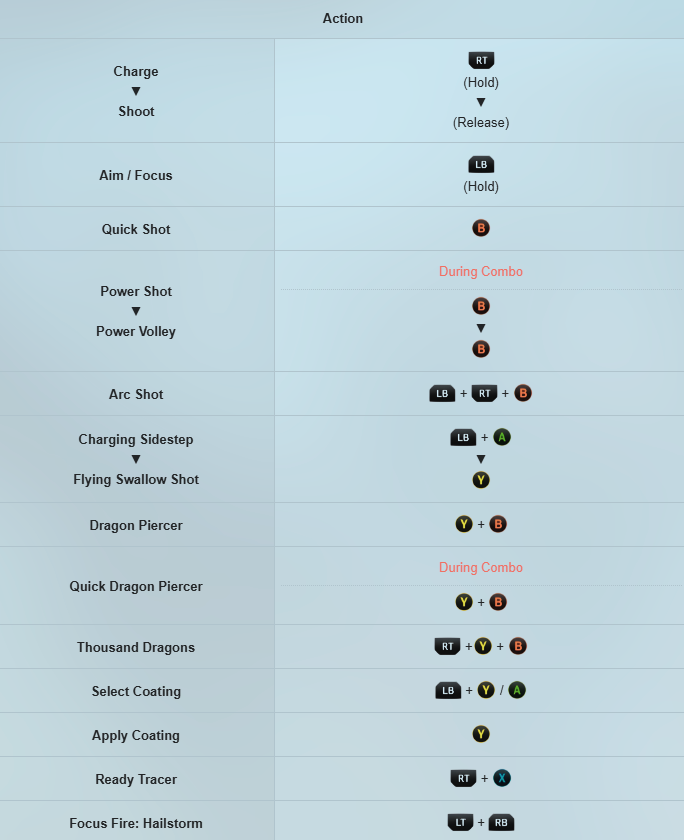
All Bow Controls
Basic Bow Controls
Monster Hunter Wilds: Best Bow Combos
Dash Dancing Combo
If you want to maximize your Bow gameplay in Monster Hunter Wilds, Dash Dancing is the way to go. It enables you to unleash Charged Shots, Power Shots, and Power Volleys rapidly, resulting in serious damage in just a few moments.
Combo Input Controls:


In Monster Hunter Wilds, Dash Dancing is a top-notch strategy for Bow users. It allows you to fire multiple Charged Shots, Power Shots, and Power Volleys in a flash, racking up damage really fast.
Remember, this combo takes a lot of stamina since it can be spammed. You’ll need to keep an eye on your stamina and be ready to dodge, or you might get caught without enough stamina to avoid an attack.
Tracer Dash Dance Combo


Players can take advantage of a Tracer Arrow to make their shots target from a distance, allowing for moves like the Power Volley to be used from farther away than usual. This can be paired with Dash Dancing, giving them the option to Dash Dance from a distance when close-range action isn’t the best move.
Low Stamina Cost Combo


In cases where your Stamina is low, the combo mentioned still lets you deal damage while keeping Stamina use low by using regular shots. Begin with a Tracer Arrow to enhance the damage of your next shots, and close it out with a quick Focus Fire: Hailstorm.
Trick Arrow Gauge Refill Combo


Holding your regular shots for a short while can recharge the Trick Arrow gauge. Fire a few Normal Shots and give yourself a slight delay between them, and you’ll see that Trick Arrow Gauge fill up in a flash.
Remember, the most effective method to recharge the Trick Arrow Gauge is to use Discerning Dodge or to hit the monster with an Arc Shot when it’s not moving.

Monster Hunter Wilds: Best Bow Tips
Take Note of Critical Distance
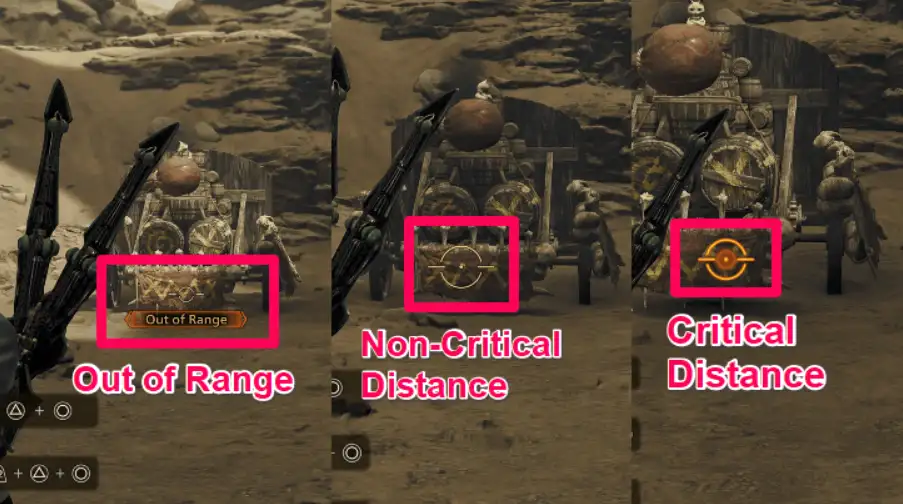
Critical Distance is basically the range where you can hit your target for maximum damage. You can tell you’re in this range when your reticle turns orange while you’re aiming. However, this can change depending on the Coating you’ve applied. If it’s not orange, you’re out of range, and your arrows won’t do as much damage to the monster.
An orange reticle doesn’t guarantee you’re dealing max damage. For example, with moves like Power Shot or Thousand Dragons, you should be right up next to the monster to ensure all your arrows connect, even if the reticle shows orange when you’re further out.
Manage Stamina With Skills and Buffs
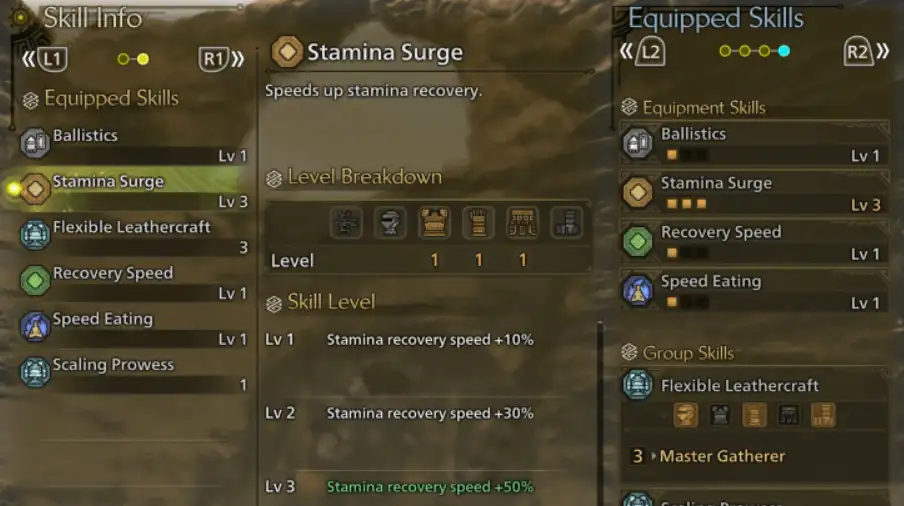
Managing your stamina is super crucial when you’re using a Bow. If you’re firing arrows quickly and dashing around, you can burn through your stamina in no time. Make sure to take advantage of skills and items like Stamina Surge or the Black Belt Meal to help you conserve stamina and recover it more quickly.
Use Dragon Piercer or Thousand Dragons on Low Stamina
If your Stamina is low but you’ve got a chance to inflict some damage, consider finishing your combo with Dragon Piercer or Thousand Dragons. You can use these moves as long as you have a bit of Stamina left. Thousand Dragons works well for close-range attacks, while Dragon Piercer is ideal for targeting down the monster’s body or across it.
Dash to Charge Attacks
Rather than just standing there and attacking, try using a Charging Sidestep to boost your Bow’s Charge Levels. This way, you can keep moving around while charging your shots. Just keep an eye on your Stamina, though, because you can tire out fast and end up getting hit if you’re not careful.
Dodge Perfectly to Regain Trick Arrow Gauge
If you use Charging Sidestep just before an attack lands, your hunter will pull off a Discerning Dodge. This evasive maneuver not only helps you dodge but also fills up one segment of the Trick Arrow Gauge. It’s definitely the quickest way to boost your Trick Arrow Gauge for coatings and Tracers, plus it gives you plenty of invincibility frames to stay safe while doing it.
Arc Shots Apply Tracers and Stun
The game has introduced a cool new mechanic for Arc Shots: they now apply Tracers to targets. You can kick things off with this or use it when a monster is stationary to trigger multiple Tracers with Focus Fire: Hailstorm. Plus, they still build up stun damage, and if you hit a monster’s head enough, they’ll get knocked down for a short time. On top of that, they’re perfect for refilling the Trick Arrow Gauge.
Mount Monsters With the Bow
Every weapon, including bows, can be mounted. Players can take advantage of this by attacking right after a Seikret dismount or when jumping off a ledge. These actions can lead to mounts, creating more opportunities to inflict Wounds on monsters while you’re riding.
How Good Is the Bow?
Tier List Ranking
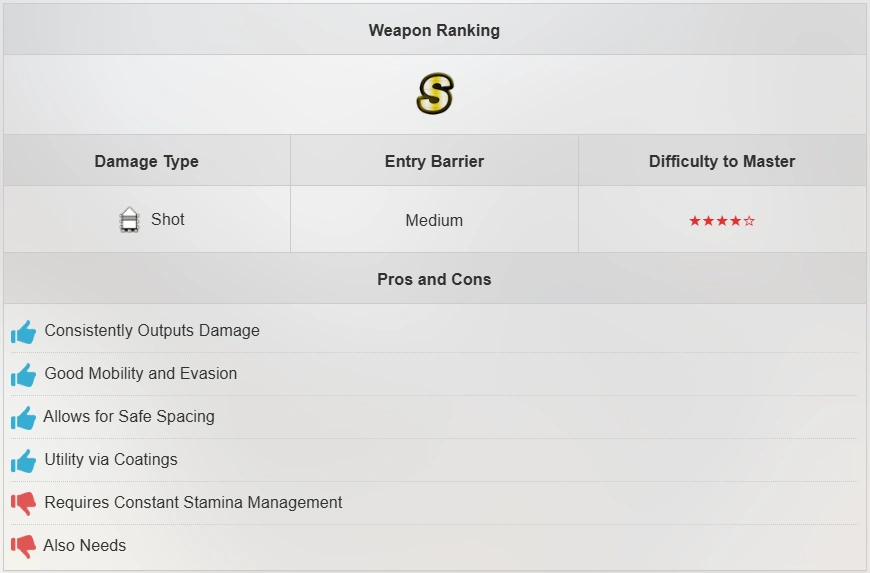
The bow is still a top-tier weapon in Monster Hunter: Wilds, sitting comfortably in S Tier. It lets you deal damage from afar while keeping you agile with the Charging Sidestep, making it super user-friendly. However, be aware that many of its moves drain Stamina, and you also have to keep an eye on the new Trick Arrow Gauge. To really boost your damage output, you’ll need to balance these two resources.


